
Because the designer of a sewing pattern can only suggest fabrics and ultimately won't know the elasticity or recovery of the fabric you've chosen for your garment, I think it's often best to draft your own rib bands. This is especially true for the neckline, where having a band that lies flat in a round or scooped neckline shape can be challenging. The best part of drafting bands is that they're easy; they're rectangles.
Step 1. Choose fabric that's suitable for your project.
I think it's best to chose a relatively lightweight ribbed fabric with this method, because in its finished state, the ribbing will be double the original thickness. My preference is to use a soft and very stretchy rib. The fabric doesn't even have to be a rib. A jersey that's stretchy and has a good weight when doubled will also work. Good recovery is helpful, if you want a snug band. If the fabric doesn't have good recovery, try inserting a layer of thin power mesh between the layers. Frankly, however, I prefer my bands on the loose side and never use mesh. It all depends on the look you're after.
Step 2. Determine the width needed.
If you'd like a neckband with the finished width of an inch, the width of the rib fabric you cut will need to be 3 inches altogether. That's 0.5 inch seam allowance, one inch for the public layer of the rib, one inch for the inside layer, and another 0.5 inch seam allowance. (Substitute your own figures.) Also, know that if you need to stretch the ribbing a whole lot in the next step (Step 3), the width of the band will be slightly narrower than the one inch you were aiming for. Draft the band a little wider, if this is an issue.

Step 3. Determine the length needed.
The length will really depend on the look desired and the stretch and recovery factors. You might want the cuffs at the wrist to really gather the bottom of a relatively wide sleeve, or perhaps you don't want any gathers at the hips. I used to always make the neckband three-fourths the circumference of the neck opening. But since all ribbing is not the same, sometimes adjustments had to be made. Unsewing happened.
There's a better way to determine the length. First, measure the neckline with a tape measure. Now lay the tape measure flat on a table and stretch the folded ribbing until it reaches the length measured for the neckline.

For example, if the neckline measures 25 inches, perhaps it will take a 20-inch length of ribbing to stretch the full 25 inches. Be sure to make it a comfortable stretch with no strain. Add an extra rib or two on each end for a seam allowance and you now have the perfect length for your band.
Step 4. Consider the band seam too!
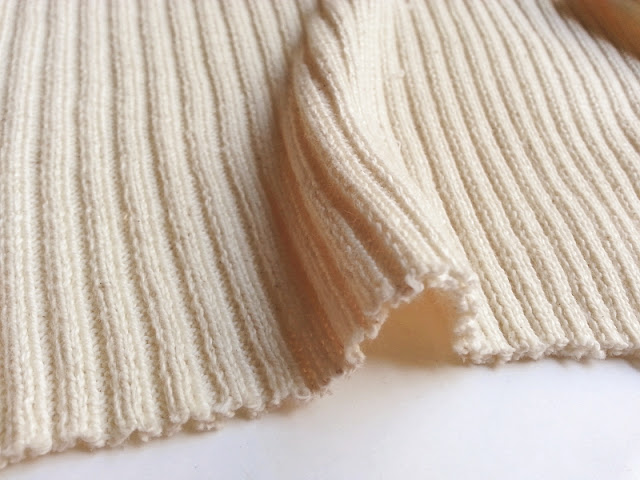
If your sewing pattern gives you instructions for inserting the band in the round (my favorite way), the next step is usually to sew the short ends, the neckband seam, so that the band becomes a circle. I prefer to sew through the knit stitches (the ridges of the ribbing). That way, when the band is folded, the seam falls on the purl stitches (the valleys of the ribbing) and isn't very visible. Sometimes I even go so far as to baste this seam first to get it just right. After basting is also a good time to check that the band actually fits over your head (or hand or hips).
After the folded neckband is sewn to the garment, steamed, and allowed to dry, the band will stretch nicely where it connects to the garment, yet lie flat against the body.
Using a commercial sewing pattern to sew your sweater? Want more tips? Click here to get the free download "Five Tips for Using Commercial Sewing Patterns with Sweater Knits". Current newsletter subscribers receive access to this tip sheet and more with each issue. I hope you'll find the Five Tips helpful.
O!
---
Last update 20Jan2019
Step 4. Consider the band seam too!
If your sewing pattern gives you instructions for inserting the band in the round (my favorite way), the next step is usually to sew the short ends, the neckband seam, so that the band becomes a circle. I prefer to sew through the knit stitches (the ridges of the ribbing). That way, when the band is folded, the seam falls on the purl stitches (the valleys of the ribbing) and isn't very visible. Sometimes I even go so far as to baste this seam first to get it just right. After basting is also a good time to check that the band actually fits over your head (or hand or hips).
 |
| Basting through the knit stitches (Click to enlarge.) |
 |
| Even before steaming, the seam is almost invisible while the band is relaxed. |
Using a commercial sewing pattern to sew your sweater? Want more tips? Click here to get the free download "Five Tips for Using Commercial Sewing Patterns with Sweater Knits". Current newsletter subscribers receive access to this tip sheet and more with each issue. I hope you'll find the Five Tips helpful.
O!
---
Last update 20Jan2019
Bookmarking this post! I love the tip for measuring the pattern and stretching the fabric to fit for band size! Thank you!
ReplyDelete~ Brooke
Glad you like it, Brooke! I was so happy when I learned it. No more saggy bands! :)
Delete