Textiles, Industry, Craft

This post is not about my knitted textiles.

I spent ages 11 through 18 in the town of Pawtucket, Rhode Island, birthplace of both Wendy Carlos and David Hartman. In the language of the Narragansett, Pawtucket's original residents, Pawtucket means "place by the waterfall".

Oh, waterfall, I hear you saying. That must have been beautiful! Well, no, not really. At one time the series of small waterfalls along the Blackstone River had been a great magnet for textile mills, and later, other industry. The Industrial Revolution that started in England had spread to New England. In fact Pawtucket's Old Slater Mill, built in 1793, is known as the Birthplace of the American Industrial Revolution. Much of the textile industry left Rhode Island in the early to mid twentieth century. Other industry came in to take its place. That waterfall was polluted for much of my time in Rhode Island. By the time I left, many factories along the river were gone. Pawtucket was beginning a beautification and renewal program. Not having any family remaining there, I kind of lost track of what happened after that.
I found this pic on Wikipedia. That's Slater Mill across the river on the left. It looks like a big yellow/white house with a cupola. The mill was red, when I was a kid. Photo credit: Marc N Belanger
Textiles (as industry) spread, flourish, move, die, and are revived. The industry that left New England moved to the Midwest and South. Much of the industry then moved to Asia. Some of this industry has returned to the US in various forms. But there are places, like North Carolina, where it never completely left. The video below is 34 minutes. It's great; do watch when you've got the time.


In Cleveland, the Ohio Knitting Mill has been reborn as a knitwear line, run by an "industrial craftsman". This video is less than three and a half minutes. Get a peek into their workspace and catch them making cut and sew sweaters in the video below.


The video is a pitch for Ohio Knitting Mill's Indiegogo fundraising campaign, which ended about 2 weeks before I discovered it. I'm very, very interested in seeing how this venture develops. I wish them the best.

Meanwhile back in England, I don't know if the women of the independent sewing pattern company By Hand London would call themselves industrial crafters. They do, however, design and create products that crafters (sewists) love. And they've got a great project planned. By Hand London is expanding to produce print-on-demand fabrics. Their campaign has 11 days to go, and they're more than halfway there as I write! You can read about and fund By Hand London's Kickstarter project here. The video is under 4 minutes.

I haven't used any of their patterns (yet), and I've done very limited surface design for printed fabrics, but I like where they're going and have happily made a small pledge. I hope they reach their goal.

O!

Making the Seams Like Spring Hat


Seams Like Spring Hat

As you I'm sure you're quite aware, during particular periods of our history, a lady wasn't properly dressed unless she was wearing gloves and a hat. Hmm... I don't even like gloves in winter. I prefer mittens. And a hat? Well, I happen to love hats! Not just structured millinery (Sadly, I own too few of those.), but also soft slouches, berets, and toques.

The Seams Like Spring hat falls about halfway between a slouch and a toque, snug around the crown and room for storage in the back. (Yes, I can shove my locs up in there.) It's a quick and easy make, once you get the hang of it. "Seams" Like Spring? Not a misspelling! It's about the seams! The seams and seam allowances are lightweight, as they should be for my chosen lacy fabric, yet the four seams add stability and a design feature to a stretchy knit hat. And no serger required!

Many of my "tutorial" posts have been my sewing notes made public -- yes, lots of notes so I won't forget how I made the thing.  When I realized what a good starter project this hat might be for someone who wants experience sewing this type of fabric, I decided to share my pattern too. This project is small, quick, and manageable. Got questions or corrections? Please leave a comment. I hope you enjoy!

Before You Begin

If you're just doing this for practice and don't care how your hat turns out, because you're never going to wear it anyway, you can skip this section! But if you want to wear your hat, be sure to start with a fabric you love and one that will work for the project. As a textile designer, I feel strongly about this. Choosing the right fabric must always be the first step! This particular hat was designed for a lacy sweater knit, but honestly, any lightweight sweater knit that you love will work. For this pattern just make sure the direction with the least amount of stretch (usually parallel to the selvage) has at least 20% stretch and you're golden. If your fabric doesn't have a selvage (because it's a circular knit), then match the directions of the V-shaped stitches in your fabric (knit stitches) to the V graphic on the printed pattern.

The pattern is cut for negative ease. That is, the measurement of your finished hat (unstretched) should be smaller that your head measurement. The finished hat will stretch to fit most heads.

You'll notice that I'll always use the word "steam" and never "press" throughout the instructions. For natural fabrics, the "cotton" or "wool" steam settings on your iron are good for steaming. If your fabric has polyester or acrylic, set your iron to the lowest possible temperature that will produce steam, and never ever touch your iron to the fabric. Always hold the iron at least a half-inch above the fabric. Pressing the iron to a springy knit fabric isn't usually advised. This is especially true for human-made fibers.

Is your fabric particularly stretchy and unstable? Is it making you nervous? Spray it liberally with spray starch and then steam it well (following directions in the previous paragraph). Allow the fabric to dry before cutting. The fabric will be a little stiff as you work, but that's ok. The starch comes out in the wash.

A walking foot, a/k/a even feed foot, for your sewing machine is a great accessory. But it's not necessary for every machine. Use a walking foot if you find that your sewing machine stretches your knit fabric out too much when sewing or if the machine starts "eating" the knits. Also reduce the pressure on your presser foot, if possible on your machine.

Materials


  • The Seams Like Spring hat pattern - Download Seams Like Spring pattern here. It's free.
  • 1 piece of pre-washed lacy knit fabric, 18 inches wide x 24 inches long - This is the minimum size. You may need more fabric if you want to match a stitch or color pattern. (If you're upcycling, cut off the side seams from an adult-sized summer sweater or top. The front and back of the sweater will provide more than enough material for the hat.)
  • 1 strip of pre-washed knit fabric for the binding, 2.5 inches wide and long enough to fit comfortably around your head, plus 1 inch (for the seam allowances. (Upcycling? Use the hem band from the summer sweater, if it's 2 inches wide or more.)
  • Matching thread
  • Little ribbon or fabric flowers
You'll also need general sewing equipment and tools:
  • A sewing machine equipped with a ball point needle 
  • Scissors or other favorite cutting utensils 
  • A steam iron 
  • Your favorite marking pen (or tailor's chalk or sliver of soap) 
  • Straight pins (preferably ball point)
  • Pattern weights (or food cans) to hold the paper pattern on the fabric

The Hat

Follow Steps 1 - 6 to construct the main part of the hat. Click to enlarge pics.

Step 1. Download and print the pattern piece.
Be sure the print settings are to print at actual size. Pattern piece includes a 1/2 inch seam allowance.

Step 2. Cut out paper pattern piece (one quarter of the hat) and place on fabric. Use weights to hold paper pattern in place.
Unlike the usual layout for a hat (or a sweater), I've placed the bottom of the hat parallel to the selvage. This is because I want the direction with least amount of stretch to go around the head with my lacy, very stretchy cotton fabric. We don't want the hat to become all stretched out after a couple hours of wearing. Keeping the least amount of stretch going around the head and the four strategic seams will help prevent this.

Step 3. Cut out one piece from the fabric, and mark pattern piece in the seam allowance, where indicated. 
Use your fabric marker, chalk, or a sliver of soap to place the 5 marks on each piece. Do not cut into fabric to make notches. Avoid stretching your cut out pattern piece! I find air erasable fabric markers the easiest to use because very little pressure is needed to make a mark. Always test your marker on cutaways before using.

Step 4. Lay your first hat quarter on fabric and use as a guide to cut out next pattern piece, matching any stitch or color patterns.
Repeat Steps 3 and 4 until all four pieces are cut. 

Step 5. Sew side seams.
Pin first piece and second piece, right sides together, matching marks on side seams. Sew side seam with a 1/2 inch seam allowance using a narrow zigzag of 1.0 mm wide by 2.75 mm long. Remember to move pins before they reach the needle!

Steam seam allowance open and flat.

Step 6. Topstitch each seam allowance flat with a wide stretch stitch.
I used a 3-step zigzag at 5.0 mm wide by 1.0 mm long, but a regular zigzag or any stretch stitch that blends nicely with your fabric can be used.

Trim seam allowance close to your stitches and steam the seam again. Your topstitching will barely show. I used contrasting thread for the example below.

Be sure to test your stitch settings on the scraps of your particular fabric. Repeat for the three remaining seams of your hat. When the four seams are completed and steamed, the hat will look something like this.

Yay! You're almost finished! Now it's time for the binding.

Make and Attach the Binding

Add your favorite binding to the hat OR follow Steps 7 - 16 below: 

Step 7. Measure and cut binding. 
Cut a strip of knit fabric 2 1/2 inches wide and long enough to go around your head, plus an extra 1-inch (for two half-inch seam allowances). If you're using a rib band from an upcycled sweater, your binding fabric only needs to be 2 inches wide.


Step 8.  Turn and steam under 1/2 inch on one long side.
Glue-baste or zigzag-baste this long edge down. (Skip Step 8 entirely and go directly to Step 9, if you're using a rib band from an upcycled sweater.)


Step 9. Sew the short ends together with a 1/2 inch seam allowance.
Steam seam allowance open. At this point the binding will look like this.

Step 10. Mark the raw edges. 
Use your favorite fabric marker to mark the seam. Then mark the halfway point on the raw edge across from the seam. Now match seam to the halfway point and mark the two quarter points.


Step 11. Pin the binding to the hat.
Match the marks on the binding to the marks on the hat along the raw edges, right sides together. Pin hat and binding together.


Step 12. Gently stretch the binding to fit the hat and add more pins.

Step 13. Using a narrow zigzag, sew binding to hat.
Use a half-inch seam allowance. My settings for the zigzag were 1.0 mm wide by 2.75 mm long. Now go around one more time, this time at 4.0 mm wide by 2.75 mm long. And be sure to remove pins before they get to the needle!

Step 14. Trim seam allowance close to zigzag stitches.
Be careful not to cut your stitches, while trimming. Steam binding toward seam allowance.

Step 15. Fold and steam binding under, enclosing and hiding the seam allowance.
Pin in place.

Step 16. Sew the binding down with a narrow zigzag stitch.
Stitch on the hat, very close to the binding. My settings for the zigzag were 1.0 mm wide by 2.75 mm long.


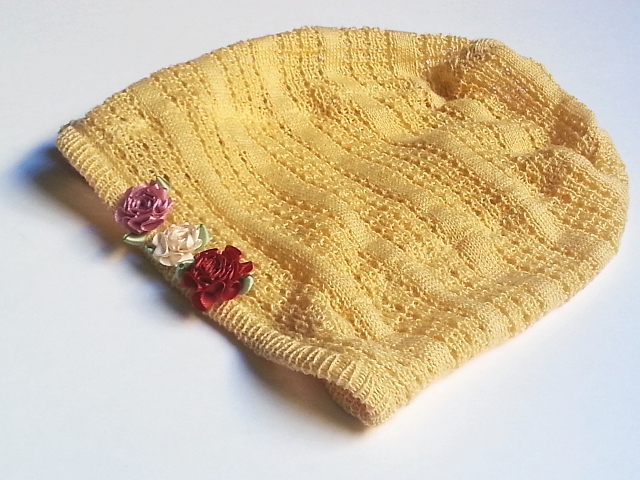
Step 17. Sew a few ribbon flowers on one side of the hat.
Sew the flowers close to the binding, then try your new hat on. 

You did it! Now go out and enjoy the spring!

O!
___
Last update 10June2016

Seams Like Spring

Pattern is now posted. Click here for free pattern. Please note: Fabrics mentioned in this post are no longer available in the shop.

I've made my favorite hat for spring!

I know it may be snowing today where you are. But we've had a few warm days here in NYC. And what better way to greet the new season than with a fun hat, ready to go. My Seams Like Spring hat is halfway between a toque and a slouch. It's light and lacy, fun and easy.

And it's got good seams! Admittedly, I tend to get all hung up on seams. But why not? Seams hold our garments and accessories together. Straight or perfectly curved, seams define the article of clothing. With lacy knits we need our seams to be sturdy and have just the right amount of stretch. Seam allowances on sweater knit fabrics need to be finished in some way to keep the edges from fraying. Yes, finding a good seam finish for a lacy sweater knit is tricky. I couldn't have a heavy seam on an openwork hat. Since there's no way to make the seam invisible, it had to be part of the design. After a little fun experimentation, I found the seam and seam finish that I'm happy with. It's lightweight and works for the Seams Like Spring hat. I know I'll use it again sometime!

And then I realized that this is the perfect, starter project! If you've been avoiding working with stretchy, springy, (Dare I say "unstable"?) lacy sweater knit fabrics, here is the project for you  Next week I'll be posting a step-by-step tutorial on how to work with lacy sweater knit fabric to cut and sew your own Seams Like Spring hat. I used my Springs pearl cotton lace-like sweater knit, but any lacy, springy sweater knit will do. Moonstone would work. (ETA June 2016 Saratoga Rib is now available and would work beautifully for this project. You can even upcycle an old lacy summer shell or sweater.

I drafted the single pattern piece (It's used four times for this hat.) so that the seams provide stability. The fabric is cut so that the direction with the least amount of stretch goes around the head. I'll provide the (free) pattern piece via pdf download next week.

If you'd like to greet spring in style, or if you just want to practice seams on lacy openwork fabric and have something pretty to show for it, give the Seams Like Spring hat a go!

Here are the materials you'll need:

  • 1 piece of pre-washed lacy knit fabric, 18 inches wide x 24 inches long -- This is the minimum size. You'll need more fabric, if you want to match a stitch or color pattern. (If you're upcycling, the front and back of a lacy summer sweater or top are perfect.)
  • 1 strip of pre-washed knit fabric for the binding, 2.5 inches wide and long enough to fit comfortably around your head, plus 1 inch (for 2 half-inch seam allowances). (Upcycling? Use the rib band from the bottom of the summer top, if it's 2 inches wide or more.)
  • Matching thread
  • Little ribbon or fabric flowers
You'll also need your standard sewing equipment: a sewing machine equipped with a ball point needle, scissors (or other cutting implements), a steam iron, your favorite marking tool, and straight pins (preferably ball point).

No heavy duty stabilization methods are required. If you're feeling nervous about your unstable fabric, have a can of spray starch handy. And no serger is necessary! The tutorial will also include my favorite way of binding an edge with sweater knit fabric.


This is going to be fun! 'Til next time...

Pattern is now posted. Click here for free pattern.

O!

___
Last edit 10Jan2016

An Exhibit of Craft and Fashion

I only cringed slightly when I learned that the American Folk Art Museum was doing a show entitled Folk Couture: Fashion and Folk Art. Fortunately, the show was not the bad mix that first popped into my head. Fashion and folk art, both pretty broad classifications have a small overlap in the wearable category, depending on whose folk art we're discussing. I fantasize that each originator of a particular folk art technology might have been considered a fashion innovator in her day, hundreds or thousands of years ago. What was the reaction the first time someone in the village developed the first embroidery? What about the guy who made the first piece of woven fabric when everyone else was still wearing skins? Fashion icon? Probably not. Everyone was probably too busy just surviving. And in the year 2214, will today's high tech fashion, forged on a 3D printer be considered folk art? Well, it could happen.

For this current exhibit at the museum, which opened January 21, 2014, thirteen "established and emerging" designers were given free rein to choose pieces from the American Folk Art Museum's collection to use as inspiration for a design. As a knit textile designer I'm always interested in how other designers find and use their inspirations. The thirteen designers showed a range from mildly influenced by their source material to close replication. Here are my favorites.
This sheer LBD (little black dress) from Jean Yu says, "I'm approachable." But that sole epaulet says, "keep your distance." (My interpretation, not the designer's!) You can read more about Yu's process here. Her inspiration was the carved wood Porcupine by David Alvarez.

Looking closely (click to enlarge) at this lacy, handkerchief dress from Catherine Malandrino, you might think that some of the fabric motifs were based on the cotton quilt behind the mannequin. They were not. Malandrino's dress was inspired by a papercut of Odd Fellow symbology. The quilt was actually an influence for a design from Fabio Costa (NotEqual).

I totally loved the effect from three laser-cut layers of patent leather for this dress by threeASFOUR.

My favorite of the show used a stars-and-snowballs motif, found on a nineteenth century coverlet, as a starting point. Gary Graham was able to have his take on the design programmed and woven on a modern jacquard loom at the Rhode Island School of Design.
Coverlet detail (left), Graham coat detail (right)


Graham's fabric "repeats" get smaller as they approach the top of the garment. I find it so very satisfying when textile and garment are designed or developed specifically for each other. See, hear, and read more on Graham's process here.

The American Folk Art Museum is located at 2 Lincoln Square, Columbus Avenue and West 66th Street, New York, NY. Folk Couture: Fashion and Folk Art runs through April 23, 2014.

O!

Fabric as Finished Object

Just when is an object a "finished object"? Well, I suppose with craftwork it's finished when the maker says it is! Usually when I tag a blog post "finished object", I show a completed garment or accessory that I made for me. But honestly, the part of me that's a knit textile designer often feels that a thing is finished when it's a good representational swatch or yardage! If I cut and sew the fabric into a piece of clothing? Well that's a whole new project!

With that in mind I present some recent/current/future finished objects ready for sharing.

Above is a striped jersey of wool and bamboo. There's a simple slipped stitch design on the reverse side, and I consider that the public side.

Below is a combination of ripples and ribs, wool and rayon. I was still in one of my ripple phases when I knitted this one. The marled yarn in the ripples is amazing and contrasts nicely with the skinny stripes of rayon. The skinny stripes have a bit of sheen that, unfortunately, doesn't show in this photo.

The fabric below is 100% wool. I consider it a sloppy plaid. I imagine it as a straight skirt with an exposed zipper. Or maybe a coat.

A version of the jersey (top photo) may be in the shop soon. I don't know which of these fabrics, if any, I'll be sewing into a piece of clothing. In any case, it won't happen right away, the bottom two are too heavy for spring, and I've got other sewing plans for spring anyway. We'll see about the fall.

If you need a custom sweater knit fabric for any season, you know how to reach me. ;)