Showing posts with label fabric care. Show all posts

The Return of Providence


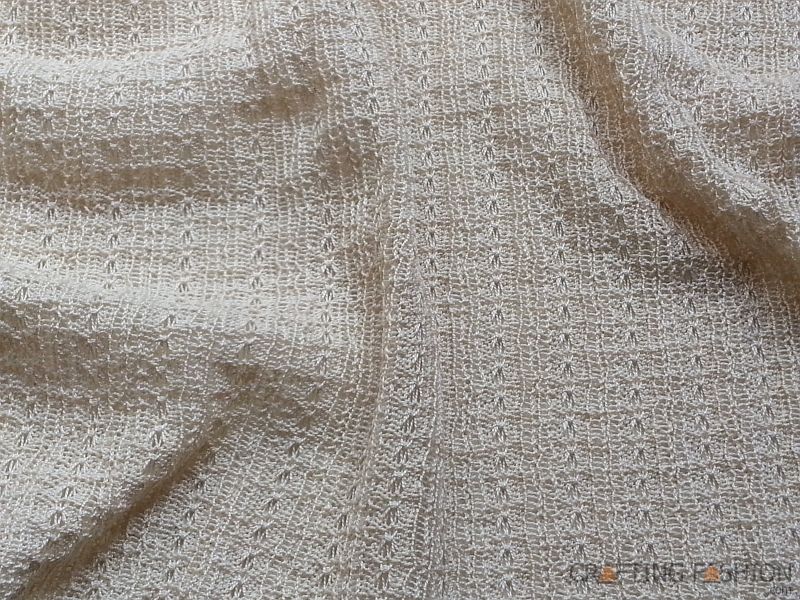
I'm extremely happy and excited to reintroduce Providence to the collection of sweater knits in the shop. Some of you, who may have read this blog in the days when I personally machine knitted most of the shop fabric, may remember posts about the Providence stitch pattern, fabric, and eventual sweater. While it's wonderful to have  the opportunity to bring back a favorite, I'm also pleased that this Providence is new and improved.

The newness comes in the dimension of width. While the old Providence, knitted on my vintage Passap machine, was limited to a relaxed 24 inches wide, the new Providence is 72 inches wide relaxed (updated Oct. 11, 2018), stretching crosswise about 25%. Most people will want to go down a sewing pattern size when using this fabric. Do be careful with any sewing pattern identified as "negative ease"; like many sweater knits, while the fabric stretches well across the width, the recovery (return to pre-stretched size) is slow. In other words, the fabric isn't suited for a body conscious sweater dress. This is 100% wool, 0% spandex.

Frankly, I'm ambivalent about the greater width. A narrow width is definitely easier to handle. If a fabric can be knitted to the width of the wearer, a narrow fabric will require less cutting and will produce less waste. On the other hand, only with custom knitting can a home sewer be provided with fabric of a custom width. When providing fabric to a variety of sweater knit enthusiasts, I'm learning it's best to go wide (especially with the fancier or more intricate designs). And so I have. A sewer can more effectively layout the pattern pieces this way. Allowing for the generous crosswise stretch, some will be able to cut an entire sweater from a single yard.

The new Providence is a little bulkier than the old, now knitted with a slightly heavier yarn. It's a beautiful medium grade, worsted spun yarn from a New England spinner and yields a fabric with amazing stitch definition and a hand knitted look. My knitting contractor referred to the fabric as "slow knitting" (with all those double tucks for texture) and having "lots of body".

Fabric Care

I'm sure you've heard this next bit of business before, if not on this site, then elsewhere. It's about being sure to prepare fabric before cutting and sewing. Always sew a zigzag stitch or overlock stitch on any raw or cut edges on the wool knit before washing. Follow the same procedure you plan to use when laundering your finished item. Remember agitation, hot water and hot dryers will shrink most wool. (Prepping Providence properly will also soften and fluff it.) Here are my recommendations for prepping or the regular washing of wool sweater knits.
  1. Launder similar colors together. Mix a small amount of mild detergent or soap in sufficient cool water to completely submerge your fabric. (Do not use Woolite. Woolite contains "optical brighteners" which can remove natural oils and "dry-out" the fabric. Do not use bleach.) 
  2. Allow fabric to soak for 15 to 20 minutes. No need to agitate.
  3. Rinse gently in cool water. You may use fabric softener, if you like.
  4. Remove excess water by rolling fabric in a towel and squeezing gently or by using the gentle spin cycle only of a washing machine.
  5. Gently smooth the fabric into shape on a flat surface, being careful not to overstretch the fabric. 
  6. Allow fabric to air dry away from direct sunlight. 
    OR you may have your fabric dry cleaned.

    I recently read about a technique of ironing sweater knits through a wet cloth in order to prep them for cutting and sewing. I can't recommend it, only because I've never tried it! Though I have a couple of exceptions, I tend to avoid pressing and ironing sweater knits. I've also heard of people using the steam cycle of a dryer to prepare wool. I've never tried the steam cycle of a dryer. (I don't have access to a dryer with steam.) I'm guessing that the steam cycle of a dryer might shrink and/or felt the fabric somewhat, because of the heat and movement?

    So far I've only worked with a 9 x 9-inch swatch of Providence. My swatch had no shrinkage when I hand washed it, as described above, and let it dry flat.

    I'm planning to make a jacket! I made a jacket.

    O!

    ___
    Last update 05June2021

    It's Earth Month!

    Remember these? They're the swatches of color-grown cotton fabric I experimented with last August. The bottom group of swatches (with 2 dots) were washed in warm alkaline water to deepen the color. This tendency to deepen in color is one of the more fun and interesting properties of color-grown cotton. My original idea was to  the experimental group regularly to see how deep the colors would become.

    Seven months later and the soaking process has remained the same for the swatches but soaked not as often as I had hoped. Since alkaline water is supposed to hasten the darkening of the color-grown cotton, the swatches with two dots were soaked in a bath of 2 teaspoons of baking soda dissolved in 5 cups warm (comfortable for my hands) water for 15 minutes and also air dried as before. I've bathed the bottom set of swatches three more times since my original post.

    And this is where I'm supposed to show a picture of the results!!

    As it turns out the results are subtle and impossible for me to capture with my (now difficult to replicate) lighting and photographic skills. I can give an anecdotal report, however. For the alkaline (two-dot) bath group, I'd still have to call the light green "light green", but it appears to be a slightly deeper light green than before. The tan fabric showed little change from the first warm baking soda and water soak. Though not quite as dramatic as I had imagined, it was a lot of fun watching the development. Do try this at home! :)

    A Brief Review

    Naturally colored fibers (like the cotton fabric above and in the shop or the wool used for O! Jolly! Westerly Openwork Rib) get their rightful mention in Sustainable Fashion & Textiles - Design Journeys by Kate Fletcher [affiliate link]. The book is a compelling treatise on the lifecycle of textiles, the impact that textile production has on fashion industry, and how the demands of fashion influence textile production. The major theme of the book can be summed up in this statement:
    After all, unless we look at a product from a lifecycle or whole-system perspective we risk ignoring major sources of environmental impact (such as the use phase), and opportunities for innovation and change.

    Cover of the most recent edition; I reviewed an earlier edition.
    This book is the real deal, researched, chock-full of statistics and graphs. It's not just the chemicals and dyes used in the manufacturing process that have an impact on the earth but also the temperature of water we choose to wash our clothes. Figures are cited. Reports are quoted. And when a report has been financed by a manufacturers' trade organization, it is acknowledged that there may be "spin". Fletcher also presents positive examples of sustainable production and actionable steps for both the manufacturer and consumer to take in order to lessen the environmental impact of clothing and textile use and production.


    Types of pollution associated with dyeing various fibers (right) and a summary of developments in dye chemistry. Click to enlarge.

    Tiny as my business is, I am a producer of textiles. Since I have no plans to personally raise the sheep, grown the cotton, or totally control the shearing, ginning, combing, spinning, dyeing (if any), along the way, there will always be compromises. I'll continue to work hard making the best decisions I can in the manufacture of my product.

    Looking Forward

    I'm thrilled to report that the natural color-grown cotton fabrics will continue to be available with new knit designs in color-grown cotton arriving soon! As I write I'm also working to offer a fabric knitted with upcycled cotton yarn. It will be exciting to be able to provide a colorful fabric in the future that's manufactured with no added dye. How is that possible? The video shows how the yarns are produced.
    Clicking will bring you to the video on the Recovertex site.

    I'm old enough to remember the first Earth Day. (It was 1970.) A few years ago I began to hear about Earth Week. Now Earth Month is the thing. So Happy Earth Month, everyone! Let's try to make each day Earth Day.

    O!
    ___
    Disclosures:  Book links are Amazon affiliate links. Opinions are my own.

    Fulling Westerly Wool


    For those unfamiliar with the term, fulling is the act of turning a wool fabric into a thicker, “fuller", often warmer fabric with more body. There are several fulling methods, some used in combination. Fulling the wool to the extreme will turn the fabric into felt.

    I was prompted to write this blog post by a comment I received on my first Westerly Pullover post with questions on my fulling technique. I'm in no way an expert at fulling, but I'm very willing to share my partially improvised method. I always enjoy discussions of fabrics and fibers, so if anyone reading this wants to add two (or more) cents, please do so in the comments. Recommended resources are also appreciated.

    I decided to take this route because I so excited to use the Westerly fabric, knitted with natural wool from the Imperial Stock Ranch. I also, however, wanted a fabric with a little more body for the type of sweater I had in mind. I wanted a very casual, everyday sweater. I thought maybe my lacy Westerly would produce a dressier sweater than what I was aiming for this time. Fulling to the rescue!

    So how does fulling work? Wool like all protein fiber has a surface layer of microscopic scales. When subjected to heat, certain soaps, agitation, or a combination of these things, the scales begin to bind together. The little spaces between the stitches get a little or a lot smaller. The fabric shrinks to some degree, though it's hard to predict how much or in what direction. A fabric with lots of drape has more body and appears thicker after fulling. A fabric that tends to ravel will now ravel less or not at all! The Westerly fabric also became a little less stretchy. 

    My method of fulling is not scientific. I don't know the temperature of the water I used or how long exactly I agitated the fabric. I simply tried it first on a swatch, liked the result, and tried to replicate the result on a bigger piece. Remember your results may vary depending on fabric, temperature, and time. Wool will sometimes go quickly from slightly fulled to full-on felt. Other wool won't full at all because it's been treated to prevent shrinking or else it's pre-shrunk. Always practice on a tiny piece before working with your garment fabric. Here's what I did:
    • I put very warm water (sufficient enough to cover my approximately 1.25 yards of fabric) into a tub with a small amount of unscented laundry detergent. The water temperature was cool enough for me to stick my hands in but not really comfortable on my skin. I wore rubber gloves for the process.
    • I swished the fabric in the water until the yarns looked plumper and hairier but with the stitch pattern remaining visible. Though the yarn was wet, I could clearly see the change in the yarn. I'm guessing I swished it for about 2 to 3 minutes. 
    • After draining the water from the tub, I rinsed the fabric with tepid water holding the shower head in my right hand and slowing redistributing the fabric as necessary with my left hand. Because I used such a small amount of detergent, this didn't take very long.
    • I placed the very wet fabric in a plastic bag. The fabric was heavy because it was still full of water, as I didn't wring or roll the fabric in a towel. Instead I carried it to the (top-loading) washing machine and ran the "spin" cycle that comes after the "gentle wash" cycle.
    • I allowed the fabric to dry on a flat laundry rack.
    And that was it! From comparing my test swatch to untreated fabric with the same stitch pattern repeat, I know that my fabric shrunk a little in length. Since I didn't measure my garment fabric after the process, I can't be sure how similar the result was compared to the swatch, but it appears to be close.

    And Now Just a Few Words about Washing Wool
    One more important thing -- even if you have no intention to full your wool fabric, it's always a very good idea to wash it before laying out your sewing pattern and cutting. I know you've heard this before from me (and others), but now I have closeup pictures to show the wonderful transformation of the wool! Here's Washington Square in Deep Raspberry after washing (in cool water with a little detergent, no agitation, air dried flat) on the left and before washing on the right.

    Washing "relaxes" the stitches, removes any wax used at the knitting mill, and simply makes the fabric easier to work with. 

    Loving the Wool, Prepping the Wool


    Wool is wonderful. It's comfortable and breathable. Knitters love it because the yarns possess a natural stretch.

    Above is a new wool fabric being made. It's actually descending from an industrial knitting machine in this picture; you're seeing it as it's being knit and temporarily stopped for inspection. The fabric hasn't had the chance to relax yet, so it's a little stretched out and stressed. But once it's rested, had a nice bath, and is thoroughly dry, the wool fiber will "full" a bit, the ripples in this fabric will be more pronounced, and the sweater knit will be ready for cutting and sewing.

    Most sewists know (or eventually learn) the importance of preparing fabric before cutting and sewing. Knowing how to prep is especially important with natural fiber fabrics. Beautiful wool fiber, like all protein fiber, has a layer of microscopic scales. If the fabric is tossed in the washer, the agitation will cause these scales to bind together; the wool will felt and shrink. High heat and tossing in a dryer will do the same to this material.

    Some wool fiber is preshrunk or pre-treated with a chemical solution to make the scales lie flat or to remove the scales from the wool. Wool made with these types of processes can often be machine washed and dried with little to no shrinkage or felting. Fabric care instructions must always be followed, especially with regard to water temperature and dryer temperature. 

    So how do I prepare sweater knit wool fabric? Here's my current favorite way of bathing the wool in preparation for cutting and sewing:
    1. Zigzag or serge any unfinished cut edges on the fabric.
    2. Add a small amount of mild detergent or soap to cool water in a tub or container. Be sure the container is sufficiently large to hold enough water to completely cover the fabric.
    3. Add fabric to the soapy water bath. Allow fabric to soak until fabric sinks to the bottom of the container.
    4. Rinse well in clear water. (Optionally, a fabric softener can be used at this point.)
    5. Squeeze out excess water by rolling fabric in a towel. Or if there's a large amount of fabric, place in a washing machine and run the gentle spin cycle only.
    6. Without stretching the fabric, lay it out flat on a mat to shape or on a couple of sweater drying racks [affiliate link]. Allow the fabric to find its size.
    In case you're curious about that fabric being knitted in the picture above, it will be available in the shop very soon it's currently out of stock. It's 100% wool. There's no way that I accurately captured the amazing color, because I photographed it under the knitting machine at the mill. It's kind of a deep raspberry in reality.

    If you have a need for custom knit fabrics, please visit this page.

    O!
    ---
    Last update 02May2025

    Color Fun with Color Grown Cotton


    I did an experiment! Above are two swatches. The one with the tag is what I ship when someone places an order. The other one is smaller, unlabeled, and has a black Sharpie dot in the corner. The one with a black dot was soaked in cold water as part of my experiment. I'll get to that in a moment.

    One of the most fun things about color grown cotton is its ability to deepen in color when washed in warm, alkaline water. As it says in my fabric description:
    Since the yarns are not dyed, the colors do not fade in the wash. The colors actually become deeper with each warm water washing, especially in alkaline water, until they reach their full potential.
    The absence of dye may make the fabric good for babies and others with sensitive skin. The color deepening effect is a fun property for anyone to play with. Though I've observed subtle color deepening when I first began knitting the yarn and washing the swatches in warm water, I hadn't done a controlled experiment until now.

    The fabric is washed in cold water and tumble dried at the knitting mill as part of the production process. Cold water does not seem to have an effect on color. Tumbling in a hot dryer doesn't seem to have an effect either.

    For my experiment I worked Mesa Plaid fabric, the solid color grown light green ribbing, and color grown tan ribbing. Each swatch was cut into two pieces. The pieces with the single black dots received a cold tap water soak for 15 minutes and were allowed to air dry. The pieces with two dots were soaked in a bath of 2 teaspoons of baking soda dissolved in 5 cups warm (comfortable for my hands) water for 15 minutes and also air dried. Here are the results.
    Hoping to get consistent lighting as my experiment continues, I've used artificial lighting for this photo. The deepening of the color is more apparent in the light green yarns. The deepening is present in the tan too, though I'm not sure the difference is captured in the photo. I don't know what the "full potential" shades of the fabrics are, but I'll continue to soak the three bottom swatches from time to time to see what happens.

    Further Reading

    • Saving Natural Color by Angela Ajootian -- a brief history of  modern conventional cotton and color-grown cotton

    O!

    Stabilizing a Sweater Knit Fabric

    Ravel or unravel? Funny that these words are considered synonyms.  Anyway, despite what many say about knit fabrics not raveling (or unraveling) or fraying, it simply isn't true for a sweater knit fabric.
    The raveling begins. And yes, I pulled the yarn of this cotton knit fabric just for this pic!


    But the fact that a sweater knit fabric might ravel shouldn't scare you away. Most well prepared wool fabrics will experience little raveling or fraying as you put the cut fabric through it's paces serging and sewing. Wool, even the superwash variety, will full a bit in the preparation. This makes the fibers stick to each other enough to survive the normal stretching involved in constructing the garment without an incident of raveling.

    I got my first taste of what terrible thing might happen while constructing the Turtle Beach Sweater. The main sweater fabric is 86% bamboo. The 14% merino mostly manages to hold the cut edges together, but there was one spot where I mishandled the fabric, playing around and stretching the neckline, and I got the beginning of a run that I feared would eat away my seam allowance. (For the record, it didn't.)

    I am now in the midst of making a cotton knit sweater for summer using this fabric.

    This loose cotton knit, will definitely have the tendency to run. But there is a solution. Actually, a solution is the solution. I made a paint-on stabilizer solution with Sulky Super Solvy(Amazon affiliate link). The instructions for making the solution are included in the package.
    Sulky Super Solvy (Amazon affiliate link)
    The product comes on a roll. Here's what the stabilizer looks like before the solution is made.

    In its solid form, Super Solvy is used to make design templates and pattern guides. But by dissolving 18 inches of Super Solvy in 8 ounces of water, painting the solution on the edges of my cut fabric, and allowing it to dry for a couple of hours, I no longer need to worry about runs, ravels, and frays. The edges have a slight crunchy feel; the fabric feeds beautifully into sewing machine or serger. Once I complete the sweater, the crunchy will disappear in the wash.


    Next time I'll only make half the recipe. I'm currently storing my remaining solution in an airtight container. I don't know yet how well it keeps.

    Working with knit fabric can require other stabilizers, too, such as stay tape, clear elastic or interfacing. I'll get to these another time.

    O!

    Preparing the Fabric Before the Cut

    Last week, during the days when I and many others were without electricity (or heat or hot water or internet or phone), I was fortunate to be able to create. In the light of day, I managed to machine knit several fabrics for upcoming projects or for eventual sale.


    I was also able to prep the fabric that I'm using for my current project. My goal, when preparing my knit fabric for sewing, is to bring the fabric to its "finished" state. Whether a fabric has been recently knitted or has been sitting on a bolt for months, the first cleaning will usually change the look and feel of the fabric, especially a natural one. The fabric may shrink or the fibers may full. It's best that this happens before cutting and sewing the piece! If I were one to have my my fabrics dry cleaned, I suppose I could simply bring them to a trusty dry cleaner before cutting. My preferred method, however, is to prepare the fabric by hand, since eventually the finished sewn item will be handwashed.

    First, I soak the fabric in water with a special wool wash like
    Eucalan     or Soak

    following the directions on the bottle. (Caution: Do not use Woolite. It contains "optical brighteners" which can remove any natural oils in the wool and "dry-out" the fabric.) When removing the fabric from the water, I don't wring it. I gently squeeze and roll the fabric in an old towel to the remove as much moisture as possible. Then, being careful not to stretch the fabric, I lay it flat to dry. I try to make sure that the fabric is square, but I don't pin it into position. Instead, I allow it to find its own size as it dries. Fortunately, this method requires no electricity and no hot water.

    There are other approaches to preparing a fabric for cutting and sewing. Although some of the methods described in the links below are for woven fabrics, they can work quite well with certain sweater knit fabrics.

    Links to other methods of prepping fabrics:
    Remember there are many varieties of fibers used in knits; be sure to test first on a small piece of fabric before committing any preparation method to the full fabric!

    O!

    ___
    Edited for clarity 07Nov2012
    Affiliate links via Amazon Services LLC Associates Program